Protected our wordpress from Hacking (Cracker)

hackedI can give you some tips

1) Update your WordPress installation to the latest available version.

2) If you have any plugins and themes installed under WordPress, please make sure that you update them to the latest version as well.

3) If you have any themes installed under WordPress, please make sure that you update them to the latest version as well. Please try to avoid FREE THEMES, as most of them contains back links to spam sites and malicious codes. If you MUST you a free theme please read the following article first.

http://www.wpstuffs.…code-wordpress-themes-plugins/

4) Install security plugins like:

http://wordpress.org/extend/plugins/limit-login-attempts/
http://wordpress.org/extend/plugins/better-wp-security/

5) Optimize your wordpress installation.

http://codex.wordpress.org/WordPress_Optimization/Caching

6) Password protect the WordPress admin directory (wp-admin) so that it will have an additional protection. You can do that through cPanel > Security > Password Protect Directories.

Hope enjoyed

Image source: http://www.cyberinvestigationservices.com/wp-content/uploads/2013/04/Hacking1.jpg

Oprek lagi Kloxo MR

kloxomrAkhir-akhir ini semakin penasaran nih sama Kloxo MR. Udah berapa tau install buang…. install buang….


Saya melakukan update di salah satu VPS Kloxo-MR saya dan setelah selesai proses update, web saya tidak dapat di akses karena ada error di settingan servernya. Saya googling cari solusi, alhamdulillah Kloxo-MR dilengkapi dengan tool untuk memperbaiki suatu masalah yang terjadi terkait dengan Kloxo-MR itu sendiri. Tool itu berada di direktori khusus yang berisi berbagai macam script untuk membantu kita memperbaiki error-error yang mungkin saja terjadi. Lokasi tool tersebut berada di:

/script

Nah biasanya memang bakal ada error sehabis kita melakukan proses update, tapi itu bukan masalah, karena biasanya saya hanya menjalankan perintah-perintah berikut (memanfaatkan tool Kloxo-MR) untuk memperbaikinya. Langkah-langkah yang saya lakukan adalah:

#sh /script/cleanup
#sh /script/fixweb
#sh /script/restart-services

Oh ya, kemarin saya juga mengalami masalah dengan tidak bisanya blog saya konek ke database padahal MySQL Servernya sendiri tidak bermasalah, ternyata yang menjadi masalah adalah tidak adanya addon MySQL di PHP nya, solusinya mudah, saya tinggal menginstall plugin tersebut dengan cara:

#yum install php*mysql

Dan Alhamdulillah VPS Kloxo-MR saya sekarang sudah dalam keadaan sehat kembali


Memang ada masalah dengan PHP 5.2. Saran saya coba gunakan Nginxproxy biar webnya kuenceng 🙂 dan ganti versi PHP nya ke versi PHP54 atau PHP53u, dengan cara:

1. Jika anda ingin mengganti ke Nginxproxy, klik menu ‘Switch Program’.
2. Jika anda ingin mengganti Versi PHP, klik menu ‘Webserver Config’, kemudian di menu ‘PHP Branch’ ganti versi PHP nya ke 5.4 atau 53u. Selanjutnya di menu ‘PHP Type’ ganti ke ‘php-fpm_event’.

Setelah itu jalankan script2 berikut:

#sh /script/cleanup
#sh /script/fixweb
#sh /script/fixdns
#sh /script/fixmail-all
#sh /script/restart-services

Kemudian jangan lupa kirimkan hasil perintah:

#sh /script/sysinfo

Nah sekarang Insya Allah gak ada masalah lagi deh

Kloxo: Common SSH commands

kloxomrFor those of you who have opted for the free Kloxo control panel on your VPS or dedicated server, here
are some common, and simple, commands you can use to make your life easier.
As with anything free, Kloxo has a few bugs any sys admin will run into. Even the big commercial packages, like cPanel, have annoying bugs.
Rather than banging your head against your keyboard for hours on end, I have complied a list of the most commonly used, and simple, command line fixes for Kloxo.
Websites fail to load:
/script/fixweb
DNS Fails to resolve:
/script/fixdns
Horde Mail gives 500 internal server errors:
/script/fixhorde
Email, in general, just does not function:
/script/fixmail
Kloxo fails to load, don’t reboot, just run:
/script/restart
While these are the most common, there are also many more /script commands.
Be careful with what you run from /script – some can have nasty consequences, if not used properly.

Installing Kloxo Web Server

Kloxo-1-11-620x326Kloxo (formerly known as Lxadmin) is one of the advanced open source and free web hosting control panel for RHEL / CentOS 5.x (32-Bit) distribution, currently not supported for 6.x. This lightweight web panel included all the leading control panel features such as FTP, PHP, MYSQL, Perl, CGI, Apache Spam Filter and much more.
It has Billing, Messaging and Ticketing system that allows you to better interactions with your customers and keep good relationship with them. It also help end user to manage and run a combination of Apache with BIND and switch the interface between these programs with any data loss. Let’s see some of the main features of Kloxo panel.

Kloxo Features

  1. RHEL / CentOS 5.x 32Bit Support
  2. Billing support integrated with software’s such as AWBS, WHMCS and HostBill
  3. Support for Apache, Lighttpd, Bind, Djbdns and FTP
  4. Easily Backup/Restore entire Hosting anywhere
  5. Full Control of DNS, Webmail, Spam filter and more
  6. Bandwidth Stasticits Report and Website Analytics with Awstats
  7. Add and Remove Domain/Sub domains
  8. Manage MySQL databases on multiple servers with PhpMyAdmin

For a complete set of features visit at Kloxo homepage.

Kloxo Prerequisites

  1. A Running dedicated CentOS 5.x server. Currently CentOS 6.x is not supported.
  2. A Minimum 256MB of RAM to run Yum
  3. A Minimum 2GB of free disk space required to install Kloxo
  4. Make sure /tmp partition has enough disk space. Kloxo uses /tmp to build and store files temporarily. If there is not enough space installation will fail.

Installation of Kloxo Web Control Panel

Step 1: Disabling SELinux

Disable SELinux in “/etc/sysconfig/selinux” file. Open this file with “VI” editor.

# vi /etc/sysconfig/selinux

And change the line to “selinux=disabled“. Save and close file.

SELINUX=disabled

Check with /usr/sbin/sestatus

Reboot the server to reflect new changes.

# reboot

Warning : If SELinux not correctly disabled, your Kloxo installation useless and you may required to reload OS to properly re-install it.

Step 2: Installing MySQL

Before getting started, make sure you’ve set your hostname properly and also you need to install MySQL. To do so, issue the following commands.

Note: If you’ve already installed MySQL and set a root password, you can skip this step and move to step #3.

# yum update
# yum install mysql-server

Start the MySQL service.

# /etc/init.d/mysqld start

Now, run the MySQL secure installation script to Secure your MySQL installation. The script will ask you to set MySQL root password and present with few questions at the prompts.

# /usr/bin/mysql_secure_installation

Step 3: Installing Kloxo

Download the latest Kloxo installer script with “wget” command, set execute permission and run the script, make sure to replace “mypassword” with your MySQL root password. During installation the script will prompt few questions and sometimes ask you to enter root password.

# yum install -y wget
# wget http://download.lxcenter.org/download/kloxo/production/kloxo-installer.sh
# chmod +x kloxo-installer.sh
# sh ./kloxo-installer.sh –db-rootpassword=mypassword

if error # sh ./kloxo-installer.sh –type=master –db-rootpassword=vanhouten7

Sample Output

Installing as “root” OK
Operating System supported OK
SELinux disabled OK
Yum installed OK

Ready to begin Kloxo () install.

Note some file downloads may not show a progress bar so please, do not interrupt the process.
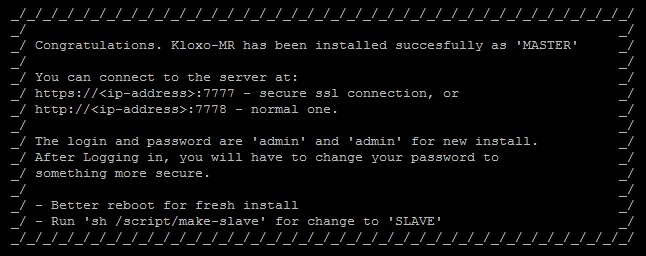
When it’s finished, you will be presented with a welcome message and further instructions.

Press any key to continue …

Go through the installation instructions on the screen in order to finish the installation. Once installation completes, you can navigate to your new Kloxo admin at:

http://youripadress:7777

http://youripadress:7778

OR

http://localhost:7777

http://localhost:7778

Please be aware that port 7778 doesn’t use SSL and traffic such as passwords and data will be sent unencrypted (plain).

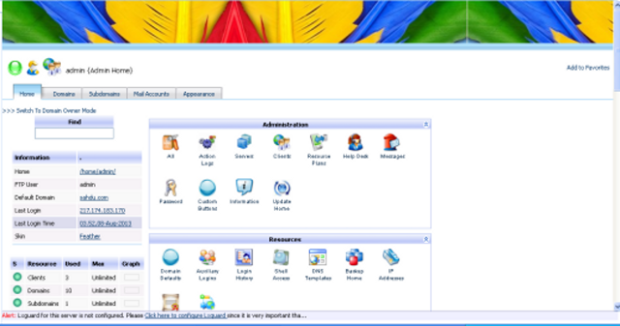
Now Login into Kloxo panel by providing username as “admin” and password as “admin“. At the first login, it force you to change your password.

Kloxo Admin Panel

Trouble Login

If you cannot login to Kloxo Control Panel, make sure your Kloxo service is running and your firewall is not blocking ports “7777” and “7778“. You can disable your firewall by stopping it.

# /etc/init.d/iptables stop

If you don’t want to stop it, you can open those particular ports on your firewall. To do so, run the following iptables rules to open it.

# iptables -A INPUT -p tcp –dport 7777 -j ACCEPT
# iptables -A INPUT -p tcp –dport 7778 -j ACCEPT

Restart iptables service.

# service iptables restart

How To Repair Mysql :

/etc/init.d/mysqld stop

mysqld_safe –skip-grant-tables &

mysql -u root

mysql> use mysql;

mysql> update user set password=PASSWORD(“newrootpassword”) where User=’root’;

mysql> flush privileges;

mysql> quit

/etc/init.d/mysqld stop

/etc/init.d/mysqld start

error di kloxo: could_not_add_mail

kloxomailMelanjutkan proyek pembangunan Kloxo MR saya, pas mau masukin domain saya agusw.com ternyata error. tidak bisa….

di situ ada error:

could_not_add_mail [Error – no authentication database connection. Initial open.]


Solusinya:

1) Reset mysql pass from kloxo interface only.
2) /script/upcp
3) /script/fixvpop
4) /script/fixmail


Selesai. masalah teratasi

Reset password admin Kloxo MR

admiinBeberapa waktu lalu, saya mengalami error dalam masuk ke admin kloxo mr.

Mau tidak mau saya harus melakukan reset admin.

dan script ini yang bekerja

Taken (but modified) from http://forum.lxcenter.org/index.php?t=msg&th=15560

1. Change root password:
Code: [Select]
su – root
passwd

2. Mysql root password: –> ERROR 1045 (28000): Access denied for user ‘root’@’localhost’
Code: [Select]
service mysqld stop

mysqld_safe –skip-grant-tables &
mysql -u root

mysql>
mysql> use mysql;
mysql> UPDATE user SET Password = PASSWORD (‘newpassword’) WHERE User=’root’;
mysql> FLUSH PRIVILEGES;
mysql> quit;

service mysqld start
or
Code: [Select]
sh /script/reset-mysql-root-password <newpassword>

3. Kloxo admin password login:
Code: [Select]
sh /script/resetpassword master <newpassword>

4. Reset Kloxo mysql password: –> Error “Could not open database connection.” when access to Kloxo
Code: [Select]
sh /script/fix-program-mysql <mysqlrootpassword>
or, enough:
Code: [Select]
sh /script/fix-program-mysql

Note: code like ‘<newpassword>’ must be change to ‘dAFfad13’ (for example; not include <>)


Alhamdulillah bekerja

namun di artikel lain nemu juga seperti ini:

sh /script/fix-program-mysql PASSWORD
sh /script/reset-mysql-root-password PASSWORD
sh /script/resetpassword master PASSWORD


Silakan pilih, mana yang cocok. Semoga sukses ya…

How to Install Kloxo-MR on CentOS 6.4 VPS machine

kloxomrKloxo-MR is a decent free to use control panel to run your web hosting server. Below are the easy steps to install Kloxo-MR on a CentOS 6.4 server

Have your CentOS 6.4 VPS machine booted and connect to it via your Console (I use Putty ssh) as a root user.

At your # prompt, type and enter to go to the root folder

cd /

Now, you will update centOS to latest version:

yum update -y

Now, install packages like package-cleanup, etc

yum install yum-utils yum-priorities vim-minimal subversion curl zip unzip -y

and

yum install telnet wget -y

and

setenforce 0

and

echo ‘SELINUX=disabled’ > /etc/selinux/config

and go back to root folder

cd /

Now, lets install Kloxo-MR, and I am always going for the tested Final Release:

Change to repo dir

cd /etc/yum.repos.d/

Now, get the repo file

wget https://github.com/mustafaramadhan/kloxo/raw/release/kloxo-mr.repo –no-check-certificate

Now, go back to root folder

cd /

Now, install

yum install kloxomr -y

Now, run setup.sh before reboot

sh /usr/local/lxlabs/kloxo/install/setup.sh

Kloxo-MR-
and, finally reboot

reboot

After the machine is rebooted, you should be able to access the Kloxo-MR via your web browser using the port 7778 or 7777 as follows:

http://Server-or-serverIP:7778

https://Server-or-serverIP:7777

Default user name and password is:

admin

More information about Kloxo-MR http://forum.mratwork.com/

Cara Install Kloxo-MR Final Release Terbaru Di Centos 6

wwwKloxo-MR adalah salah satu kontrol panel webserver hosting gratis yang mempunya fitur lengkap dan mudah untuk dikonfigurasi dari pada Koxo official karena terdapat beberapa pilihan webserver sesuai dengan kebutuhan. Kloxo-MR sendiri dikembangkan oleh orang indonesia yang bernama Mustafa Ramadhan, walaupun gratis tapi fitur dan kemampuannya tidak kalah dengan kontrol panel berbayar seperti cPanle, Plesk Panel dan DirectAdmin. Kloxo-MR sekarang sudah bisa diinstall di centos 5 atau centos 6 baik 32 bit maupun 64 bit.

Fitur yang paling menonjol dari kloxo-MR dibandingkan Kloxo Official adalah adanya pilihan webserver seperti lighttpd, apache, nginx-proxy, nginx, dan lighttpd-proxy. Untuk php branch tersedia beberapa pilihan seperti php53, php53u dan php54, yang tidak kalah menarik Kloxo-MR mempunyai beberapa pilihan php type seperti mod_php, suphp, php-fpm, fcgid dan berbagai turunannya juga terdapat opsi dual-php. Dilihat dari fitur di atas, user Kloxo-MR akan bisa lebih mengembangkan dan melakukan konfigurasi sesuai dengan kebutuhan webnya masing-masing agar menjadi lebih efisien dan lebih canggih.

Berikut adalah Cara Install Kloxo-MR Final:

Pertama masuk ke root SSH bisa menggunakan aplikasi Putty atau Bitvise SSH Client, saya sendiri lebih suka pakai Bitvise SSH Client kerena bisa copy paste. (note: untuk perintah di SSh tanda “#” tidak termasuk)

   # cd /

Jalankan perintah di bawah untuk update centos ke versi yang terbaru

# yum update -y

Install beberapa paket yang dibutuhkan untuk kloxo-MR

# yum install yum-utils yum-priorities vim-minimal subversion curl zip unzip -y
# yum install telnet wget -y
# setenforce 0
# echo ‘SELINUX=disabled’ > /etc/selinux/config
# cd /

Download repo kloxo-MR untuk versi final atau terbaru

# wget https://github.com/mustafaramadhan/kloxo/raw/rpms/release/neutral/noarch/mratwork-release-0.0.1-1.noarch.rpm –no-check-certificate
# rpm -ivh mratwork-release-0.0.1-1.noarch.rpm
# yum update mratwork-release

move to /

# cd /

Update mysql karena Kloxo-MR membutuhkan mysql/mariadb version 5.1++

# yum clean all
# yum install yum-plugin-replace -y
# yum replace mysql –replace-with=mysql55 -y
# chkconfig mysqld on

Install kloxo-MR

# yum install kloxomr -y
# sh /script/upcp
# reboot

Selesai sudah cara install kloxo-mr final, sekarang anda bisa memulai konfigurasi webserver kloxo-MR . Untuk pertama kali masuk Kloxo-MR, buka browser ketik alamat IP:7778 lalu login menggunakan user: admin dan password: admin.

Setelah itu pastikan port 7777/tcp dan 7778/tcp terbuka , dan biasanya default CentOS masih tertutup maka kita harus membukanya, kalau tidak kita buka menurut pengalaman beberapa kali install saya gagal terus. ketikkan perintah berikut di Console SSH :

# iptables -I INPUT -p tcp –dport 7777 -j ACCEPT

# iptables -I INPUT -p tcp –dport 7778 -j ACCEPT

baru di restart : service iptables restart

Taraaaaa KloxoMR sudah bisa di akses

Kejujuran di awal tahun

taun baruSaudaraku.. Diawal tahun ini, mari kita mengingat kembali.. betapa kita sering belum jujur pada diri kita sendiri. Sudahkah kita benar-benar ikhlas dalam bekerja? Sudahkah kita benar-benar adil dalam mengambil keputusan? Sudahkah kita benar-benar arif melihat sudut pandang? Sudahkah kita benar-benar jujur dalam keseharian? Sama pikiran dengan ucapan? Sama kata dengan perbuatan? Saudaraku, Kita tahu bahwa apapun alasannya, ALLAH SWT Maha Tahu apa yang sebenarnya ada dalam hati Kita. Mari segera kita akui kesalahan kita, dan mohon Ampun kepada-NYA. Bertaubat….berjanji untuk tidak mengulanginya, agar kita benar-benar pantas menerima ampunan dari-NYA… Astaqhfirullahal adzim… Tetap Semangat… Semoga Tahun Depan Penuh dengan Kelimpahan dan Barokah… Amin Ya Arham…

Sukses adalah hak kita

suksesSemangat Pagi Saudaraku….. SUKSES adalah HAK kita semua…

Sukses bukan milik orang2 tertentu, sukses milik Anda, milik sy dan milik siapa saja yg benar2 menyadari, menginginkan dan memperjuangkan dgn sepenuh hati

Jangan takut gagal sebelum mencoba. Jangan takut jatuh sebelum melangkah. Kesuksesan milik orang2 yg BERANI mencoba. Ingat, apa2 yg tidak mungkin, seringkali belum pernah dicoba

Seringkali KESEMPATAN menyelinap dibalik kesulitan dan rintangan. Selama kita tidak lari dari kesulitan, rintangan & berani menghadapinya, maka KESEMPATAN SUKSES pasti akan muncul di hadapan kita..

Tetap Semangat dan Terus BERKARYA POSITIF!!!

Selama kita masih mempunyai TEKAD dan TARGET untuk diraih, maka KESUKSESAN BESAR selalu menanti